We deal with water resistant and shock proof cell phones very often. The iTravel (i-TRAVEL LM801) is among them. It showed fine results in our tests. But this time we tortured its “younger brother”: the iTravel LM121B. It is also ruggedized but has many more features. First of all we should say that the LM121B model is IP57 protection certified which means that you can dunk it under water with no problem. The LM801 is only splash resistant. But now we have the handset that can never be drowned because it is able to float.
The retail package is quite poor, by the way (Pic. 1, 2). There is no handshaking dynamo charger. The appearance of the phone is very simple. It’s not eye-catching (Pic. 3, 4). As usual we got two iTravel LM121B handsets. Both of them are black (you may also find this phone in orange colours). We should also mention a rather small screen. The phone sports no camera but has an inbuilt flashlight. The majority of shock proof cell phones have their batteries locked with a screw but the iTravel went further. The battery cover can be taken off easily with the help of only one finger. You can put the cover back fast with no problem too. If the handset is really water, dust and shock proof we have to admit that the manufacturers did their best to create not only a robust phone but also the one that is comfortable to use. Read further and you’ll know how much praise it deserves.
Results
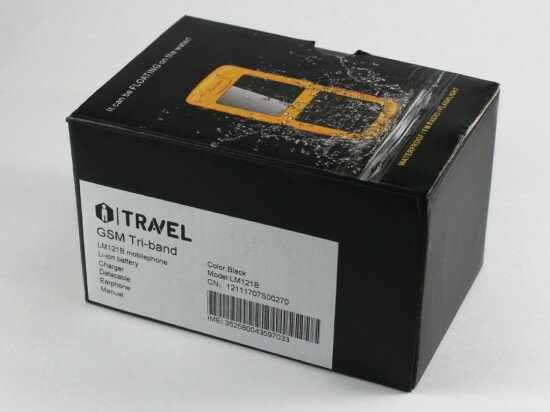
Pic.1. Package box
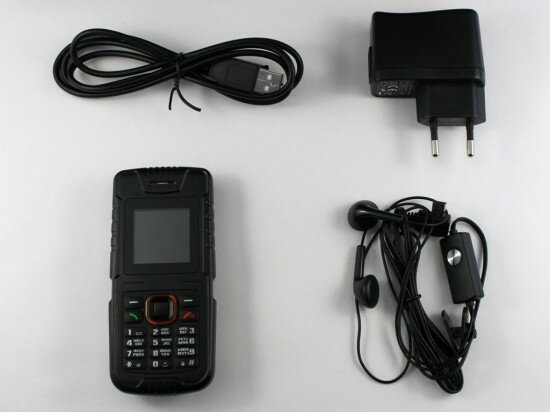
Pic.2. Accessories
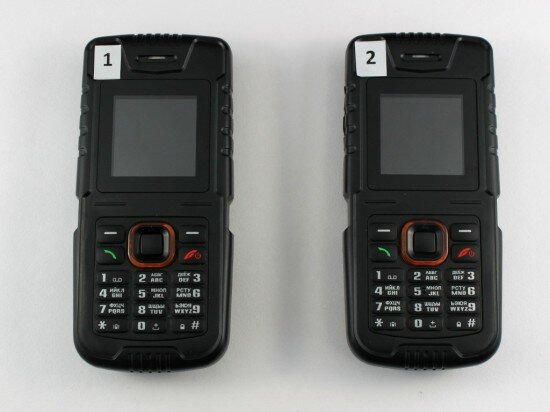
Pic.3 The iTravel LM121B from the front
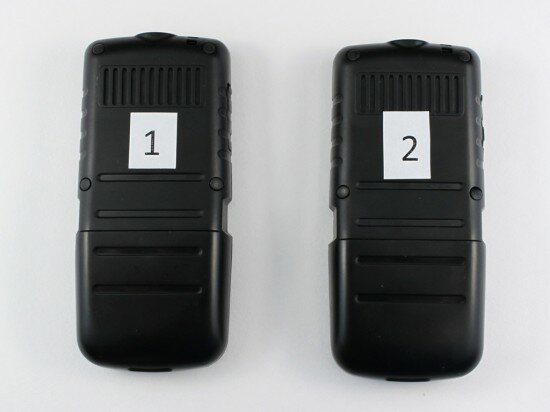
Pic.4. The iTravel LM121B from the back
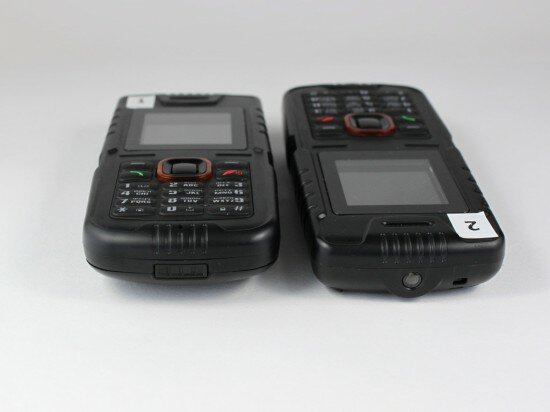
Pic.5. The iTravel LM121B’s top and bottom parts
The i-Travel LM121B stress tests (the 1st handset)
1. Reception
From the very beginning we marked both phones in order to distinguish them from each other. Then we prepared everything for the test of the 1st handset. First of all we wanted to check its signal strength. We placed the phone inside a cardboard box. Then we covered the box and the lid with foil (outside) and cut a slot into the top of the lid. This is the way we create conditions of poor reception.
The test was performed in 3 stages (from the easiest to the toughest one). In every stage the dimensions of the slot in the lid were different: at first 40 mm by 50 mm (1.57-inch by 1.97-inch), then 20 mm by 20 mm (0.787-inch by 0.787-inch) and finally 15 mm by 15 mm (0.59-inch by 0.59-inch). Check out video 1 – 3.
Even at the first stage of the test the reception was reduced by half. At the second and the third stages the signal indicator displayed only 1 bar. However, the i-Travel LM121B received all incoming calls with n problem.
Video 1. Reception quality (stage 1)
Video 2. Reception quality (stage 2)
Video 3. Reception quality (stage 3)
Grade (stage 1): 3 (with 3 being the highest possible grade)
Grade (stage 2): 3 (with 3 being the highest possible grade)
Grade (stage 3): 3 (with 3 being the highest possible grade)
2. Freeze test
It’s not a secret that almost all mobile phones don’t work properly in cold weather. In freezing temperatures, cell phone batteries deplete quicker than usual (that is, their capacity goes down much faster compared to moderate temperatures), the keys become stiff and displays malfunction very often. We checked the performance of the i-Travel LM121B in such an environment. Actually we placed the phone in a freezer and kept it there for 2 hours in speaking mode and for 30 minutes in standby mode.
The handset passed this test easily (video 4). The battery stayed full. The keys were a little bit stiff and the display malfunctioned from time to time but we could use the phone with no problem.
Video 4. Here’s how the phone looks like after the freeze test.
Grade: 3 (with 3 being the highest possible grade)
3. Short circuit of the battery charger
Now we are going to tell you about the series of electrical tests for the i-Travel LM121B. We started with battery charger: connected its terminals for a second and produced a short circuit (video 5). The transformer of the charger suffered greatly and we even heard it beeping. But the charger stayed functional. It worked pretty fine after the test.
Video 5. Short circuit of the battery charger
Grade: 3 (with 3 being the highest possible grade)
4. Short circuit of the battery
We tested the battery the same way as the charger. We connected the terminals (“+” and “-“) for a second and made a short circuit (video 6). The battery stayed functional. The phone worked with no problem with this battery inside it.
Video 6. Short circuit of the battery
Grade: 3 (with 3 being the highest possible grade)
5. Charging the phone with incorrect voltage
In this test we simulated a situation when the phone’s battery is charged with a non-standard charger. Actually, we plugged the regulated power supply into the outlet. Then we plugged one end of the battery charger into the regulated power supply and the other end into the phone and raised the voltage to 8 V (video 7).
The charging was stopped even at 6 V. But current consumption was OK. Then we decreased the power and the charging was restored. The phone stayed functional.
Video 7. Charging the phone at a higher rate
Grade: 3 (with 3 being the highest possible grade)
6. Providing the phone with incorrect power
This is the last and the most dangerous test of this “group”. We checked how the i-Travel is able to withstand overvoltage. We took off the back cover, lifted the battery out of its compartment and connected the regulated power supply into the phone directly and increased power supply (video 8). This experiment shows how fine a handset can perform with a non-standard battery inside it.
When the power supply reached 7 V, current consumption rose very high. It means that the phone is not “prepared” for such situations. In normal conditions the phone consumes 20 mA but during the test it started to consume 540 mA. Nevertheless, the handset stayed functional. When we reduced the power supply, the phone’s current consumption was decreased too. The gadget worked with no problem after the test.
Video 8. Providing the phone with incorrect power
Grade: 3 (with 3 being the highest possible grade)
7. Leaving the cell phone out in the rain
After the series of electrical tests we performed some water experiments with the iTravel LM121B. At first, we simulated a situation of the phone’s getting wet in the rain. Actually we put the handset under shower for 1 minute (video 9).
This waterproof phone passed the test with no problem. The speaker and the microphone started to reproduce sound not as loud as before. But anyway we could live with it. We should also remind you that the iTravel LM121B’s water resistance is 1 m (3.28 feet).
Video 9. The i-Travel under shower
Grade: 3 (with 3 being the highest possible grade)
8. Submerge to a shallow depth
In this test we tried to dunk the phone under water for 20 seconds (not very deep). As you can see from video 10, the handset didn’t want to be drowned. The i-Travel saved itself. The handset was floating on the surface of water. As a result, we found no water under the back cover of the phone. All the connectors were dry due to the caps.
Video 10. Immersion in water
Grade: 3 (with 3 being the highest possible grade)
9. Submerge to a depth of one meter for 20 seconds
Only the cell phones which are not waterproof are eligible for this test.
Grade: –
10. Submerge to a depth of one meter for 30 minutes
Only Ipx1 – IPx6 waterproof phones are eligible for this test.
Grade: –
11. A full submerge to a depth of two meters (6.6 ft)
In this test we dunked the iTravel LM121B under water to 2m (6.6 ft). We threw the phone in the tube filled with water. The length of the tube was longer than an average person’s height (Pic. 6, video 11). In order to drown the handset we tied a load to it (video 12). The iTravel spent 1 hour under water.
We are glad to say that the phone successfully passed this experiment. Being under water it received all incoming calls. We heard the sound from the speakers and even the vibration.
When we examined the gadget, we found no problems. The handset worked pretty fine and rang loudly. Very little water penetrated the phone. We saw a few drops between the casing and the back panel (on the stopwater material) (video 14). Evidently, it got wet when we took off the back cover. The connectors were dry due to the caps.
We should put the highest grade for the iTravel LM121B in this test. This phone is really water resistant.
Video 11. Thin glass tube filled with water
Video 12. Submerge to a depth of 200 cm (6.6 feet)
Video 13. Here’s how the phone worked under water
Video 14. Here’s how the phone looked like after the test
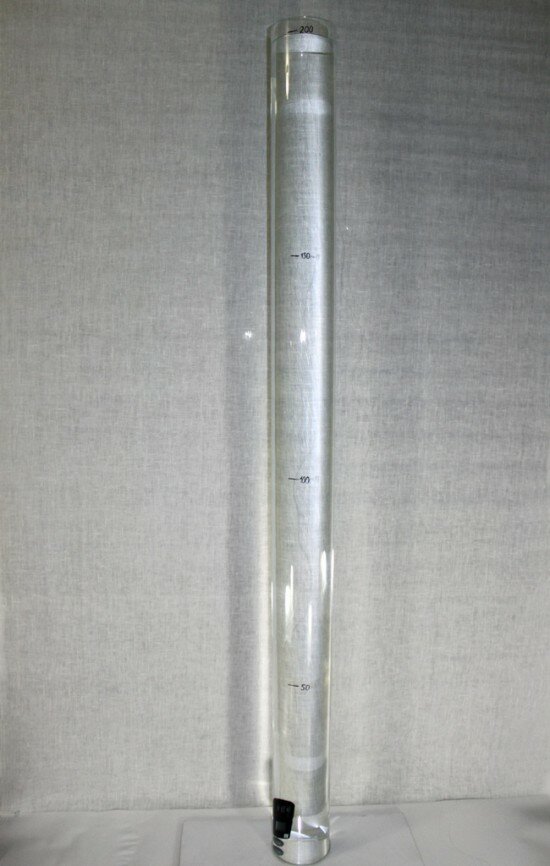
Pic. 6. The phone is under water at the depth of 2 m (6.6. ft)
Grade: 3 (with 3 being the highest possible grade)
12. Immersion in beer
In the end, we threw the iTravel in beer – the most popular alcoholic drink in the world. May be you spilt some beer on your cell phone one day? We dunked our handset under beer for 10 seconds (video 15).
As you can guess, the LM121B sustained no damage. We washed it under a running tap and it worked.
Video 15. Immersion in beer
Grade: 3 (with 3 being the highest possible grade)
13. Disassembling. Build quality
The first handset of the iTravel LM121B model passed all the tests with no problem. We disassembled it in order to have a look how fine it’s built. The back cover is attached to the casing by 6 screws. 4 of them are covered with rubber caps. There is also a rubber stopwater material between the panels of the phone (Pic. 7, 8). In some areas the panels are lubricated with something like silicone sealant.
The circuit board is attached by the screws and catches (Pic. 9). The design of the board is simple, typical for all cheap mobile phones. The screen, the speaker and the microphone are soldered to the circuit board. So it’s difficult to replace these elements. On the other hand, this design makes the circuit board more rugged. In our opinion, for a shock proof cell phone this is a better choice.
The manufacturers made the speaker and the microphone water resistant in a very interesting way. They stuck rubber stopwater material in their slots. This material vibrates when the phone rings but it doesn’t spoil sound or call quality. At the same time it makes the speaker and the microphone waterproof. The speaker is very loud, by the way. You won’t miss a call even if you put handset deep in the rucksack.
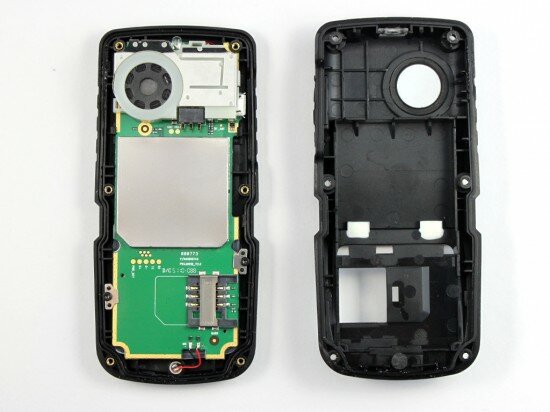
Pic. 7. The back cover taken off
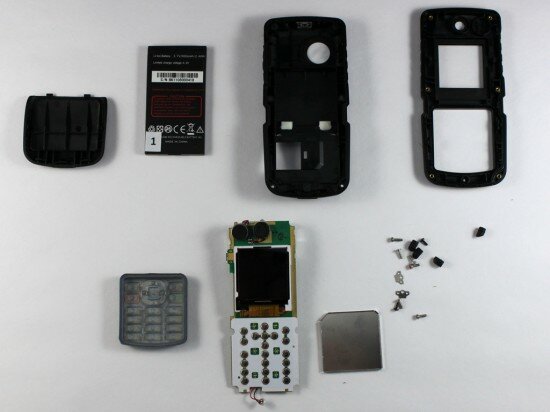
Pic. 8. The phone disassembled
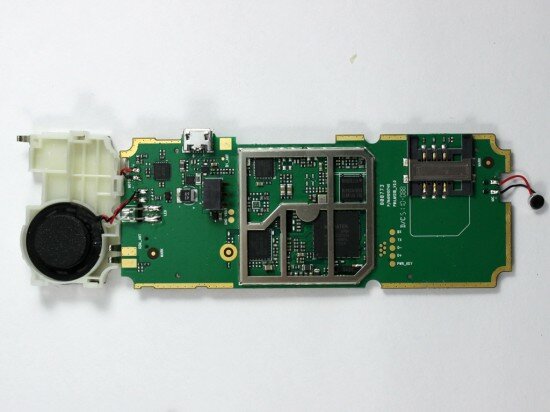
Pic. 9. The circuit board
Grade: 3 (with 3 being the highest possible grade)
14. Headphone cable testing (bending)
In this test we tortured the headphones which come in the box with the phone. We locked the wire in a special device and bended it many times (video 16). This experiment was performed in 3 stages: 1000, 1500 and 2000 bends. We checked the state of the headphones after every stage.
This didn’t break the wire and the headphones stayed absolutely functional.
Video 16. Bending the wire
Grade (stage 1): 3 (with 3 being the highest possible grade)
Grade (stage 2): 3 (with 3 being the highest possible grade)
Grade (stage 3): 3 (with 3 being the highest possible grade)
15. Headphone cable testing (static loads)
The headphones didn’t short out when we bended their cable but what will happen if we try to tear it? In order to answer this question we stretched out the cable and hung three loads on it like people hang their clothes on the clothesline. Each of the loads weighed 1 kg (2.2 lbs) (video 17).
This also didn’t break the wire and the headphones worked with no problem.
Video 17. Headphone cable testing (static loads)
Grade (stage 1): 3 (with 3 being the highest possible grade)
Grade (stage 2): 3 (with 3 being the highest possible grade)
Grade (stage 3): 3 (with 3 being the highest possible grade)
The iTravel LM121B stress tests (handset № 2)
1. Cell phone’s reception
We took the other iTravel LM121B (a new one) and checked its reception ability and talk time at first. The conditions are the same as for the 1st handset of this model that we tortured in part 1 of this review.
The result is also the same. The signal indicator showed that the reception was poor. However, the phone received all incoming calls with no problem.
Grade (stage 1): 3 (with 3 being the highest possible grade)
Grade (stage 2): 3 (with 3 being the highest possible grade)
Grade (stage 3): 3 (with 3 being the highest possible grade)
2. Talk time
First of all, we charged the battery as much as possible. Its capacity is only 650 mAh, by the way. The designers had to sacrifice the talk time in order to make the phone “float”. Nevertheless, the iTravel LM121B has 3 hours of talk time (official information from the website).
We checked whether it’s true or not by doing the following: the phone was placed in an area with a strong reception. Then we called to the phone and pressed the “call” button in it. The handset was left in this state for an hour. Our mobile operator doesn’t allow speak on the phone for more than 60 minutes. So we had to repeat everything until the battery depleted. We are glad to say that the iTravel worked for more than 10 hours. This is a perfect result. But mind that we tested the handset in good reception conditions. If the signal is not very strong the battery will deplete faster.
Grade: 3 (with 3 being the highest possible grade)
3. Drops on the carpet
The manufacturer claims that the iTravel LM121B is able to stand up to knocks, bumps and drops from 150 cm (4.9 ft). In our test we successively dropped it from 100 cm (3.28 ft), 150 cm (4.9 ft) and 200 cm (6.56 ft) on the carpet (video 18 – 20). The handset was bumped with each face, edge, and corner (all in all for 6 times).
As we expected, the results were pretty fine. The phone sustained no visible damage.
Video 18. Drops on the carpet from 100 cm (3.28 ft)
Video 19. Drops on the carpet from 150 cm (4.9 ft)
Video 20. Drops on the carpet from 200 cm (6.56 ft)
Grade (stage 1): 3 (with 3 being the highest possible grade)
Grade (stage 2): 3 (with 3 being the highest possible grade)
Grade (stage 3): 3 (with 3 being the highest possible grade)
4. Drops on a tile
This time we dropped the iTravel LM121B on a tile from 30 cm (11.8 inches), 50 cm (1.64 ft) and 100 cm (3.28 ft) (video 21 – 23). The result was also fine. The phone showed no damage and stayed functional.
Video 21. Drops on the tile from 30 cm (11.8 inches)
Video 22. Drops on the tile from 50 cm (1.64 ft)
Video 23. Drops on the tile from 100 cm (3.28 ft)
Grade (stage 1): 3 (with 3 being the highest possible grade)
Grade (stage 2): 3 (with 3 being the highest possible grade)
Grade (stage 3): 3 (with 3 being the highest possible grade)
5. Crushing the phone with a wooden bar
As you know, the iTravel LM121B is a shock proof mobile phone. But we are not going to lay it on the rails and wait for the nearest train. Instead, we tried to crush it as all the other handsets. We laid a wooden bar on the phone and applied pressure above the bar: 5 kg (11 lbs), 20 kg (44 lbs) and 50 kg (110 lbs) (Pic. 10). We performed this test in 3 stages as you can guess.
The back cover of the phone is not smooth. All the pressure was directed to the two protruding areas of the panel. However, even 50 kg (110 lbs) didn’t damage the gadget. The battery and the phone itself stayed absolutely safe.
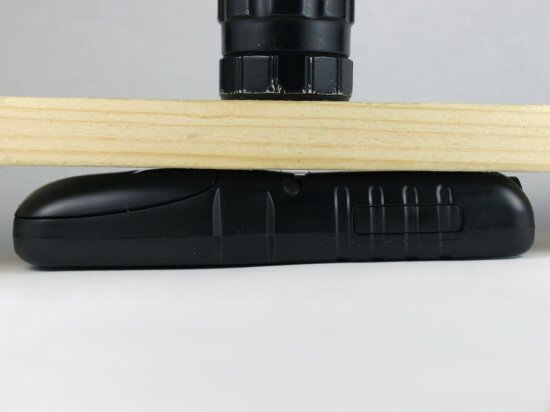
Pic. 10. Crushing the phone with a wooden bar
Grade (stage 1): 3 (with 3 being the highest possible grade)
Grade (stage 2): 3 (with 3 being the highest possible grade)
Grade (stage 3): 3 (with 3 being the highest possible grade)
6. Breaking the cell phone in half (bending)
In order to bend the i-Travel we put it onto the two planks so that each edge of the phone lay on a single plank. Then we hitched a string with a 3 kg (6.6 lbs), 7 kg (15.4 lbs) and 15 kg (33 lbs) load respectively for every stage of the test (Pic. 15).
The handset is quite thick. The build quality is fine. So we saw no bend at all.
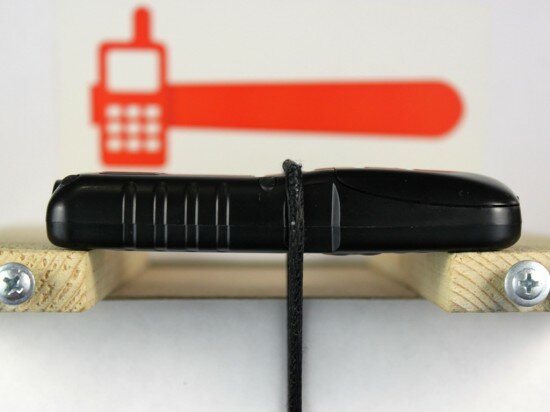
Pic. 11. Bend test (15 kg pressure)
Grade (stage 1): 3 (with 3 being the highest possible grade)
Grade (stage 2): 3 (with 3 being the highest possible grade)
Grade (stage 3): 3 (with 3 being the highest possible grade)
7. Keyboard
The iTravel LM121B has a rubber monolithic keyboard. The navigation key is plastic. We rarely found a shock proof cell phone with a comfortable keyboard. This handset is not better than the others in this respect. The rubber keys are too soft and are not very convenient to use.
The keyboard deserves 2,5 points (with 3 being the maximum). But we have to put a general grade, based on the results of all the experiments. So we gave it 2 points rather than 3 because it was damaged during the heat test (read further).
Grade: 2 (with 3 being the highest possible grade)
8. Dust test
If you prefer using cheap cell phones you’ll never think about their dust resistance. However, if you live an active way of life you should take this into consideration. The iTravel LM121B is IP5x certified for dust resistance. It doesn’t mean that it is 100 % dustproof. You may find some tiny grains of dust inside this phone anyway. But in general, dirt is not a problem for the LM121B.
In this test we placed the phone in an enclosed tray containing dust. Then we successively made it vibrate viciously for 1, 3 and 6 minutes (video 23). After every stage of the experiment we examined the state of the handset. The results were always pretty fine (Pic. 12). All the connectors were clean (Pic. 13). There was no dust under the back cover and in the battery compartment (Pic. 14). The phone stayed absolutely functional.
We cleaned the phone with mo problem. Some small grains of dust stuck in the speaker grille. We washed it with running water and got rid of all the dirt.
Video 24. Dust test
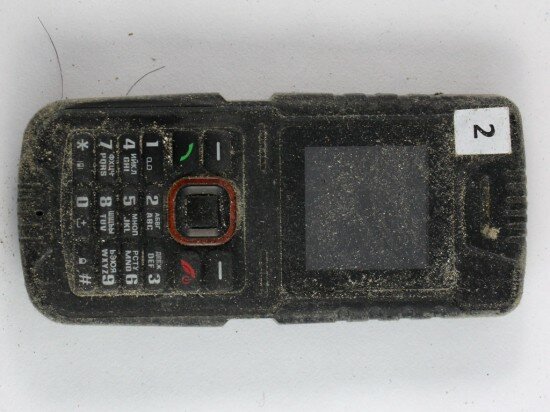
Pic. 12. The state of the phone after the 3rd stage
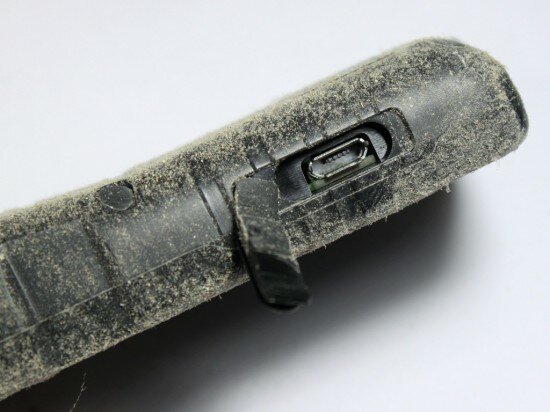
Pic.13. The state of the charger jack after the whole test
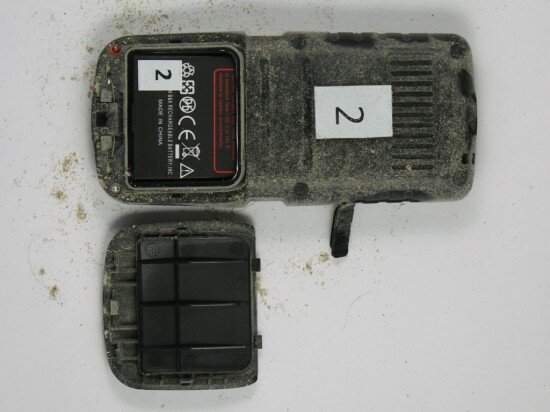
Pic.14. Here’s how the back cover looked like after the whole test
Grade (stage 1): 3 (with 3 being the highest possible grade)
Grade (stage 2): 3 (with 3 being the highest possible grade)
Grade (stage 3): 3 (with 3 being the highest possible grade)
9. Durability of the front panel
Now we’d like to tell you about a series of tests that are aimed to damage the phone’s body. In this experiment we placed the i-Travel face down into the box that contained some plastic balls and made it vibrate violently (video 25). This is how we simulated the phone’s friction against a rough surface. We divided the tests into 3 stages (5, 10 and 15 minutes) and examined the state of the gadget every time.
As a result, we noticed some small scuffs on the front panel (Pic. 15). They don’t strike the eye if not to look carefully.
Video 25. Durability of the front panel
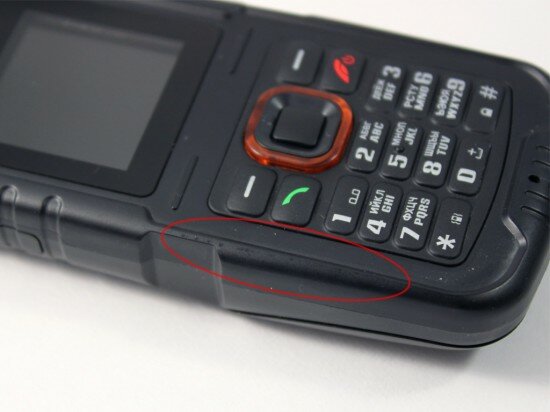
Pic. 15. Scuffs on the front panel
Grade (stage 1): 3 (with 3 being the highest possible grade)
Grade (stage 2): 3 (with 3 being the highest possible grade)
Grade (stage 3): 3 (with 3 being the highest possible grade)
10. Simulation of carrying the phone in a pocket
This is a tougher test, compared to the previous one. We used not only plastic balls but also keys and pennies. We threw the phone into a drum together with this stuff and rotated it at the speed of 500 rpm in order to make all the things strike against each other (video 26). The experiment lasted for 5 minutes. Then we took out the phone and examined its state. There were some scuffs and dents on the corners (Pic. 16, 17).
We placed the phone in the drum again and rotated it for 10 minutes at the same speed. As a result, the handset got several scratches on its body (Pic. 18). Finally, we rotated the drum with the phone, keys and pennies for 20 minutes. When the test was finished, we found out that the back was removed, the battery fell out of its compartment and one of the screws was driven out (Pic. 19). The phone sustained a lot of scratches on the sides, corners and edges (Pic. 20). The number of scuffs and dents on the front panel increased greatly (Pic. 21). The screen glass also showed many scuffs. So we can infer that the iTravel LM121B is made of a low quality plastic. However, it doesn’t mean that this handset is not ruggedized. Despite the visible damage, the phone stayed absolutely functional.
Video 26. Simulation of carrying the phone in a pocket
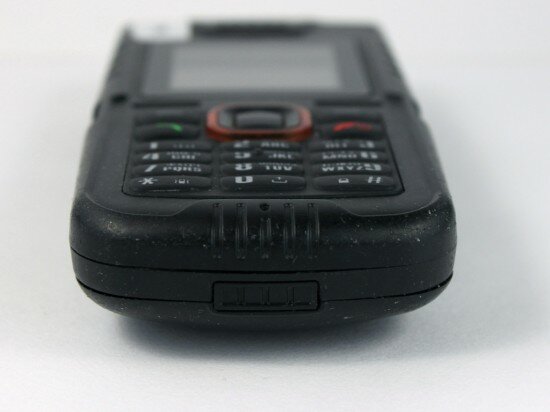
Pic. 16. Small scuffs after a 5-minute test
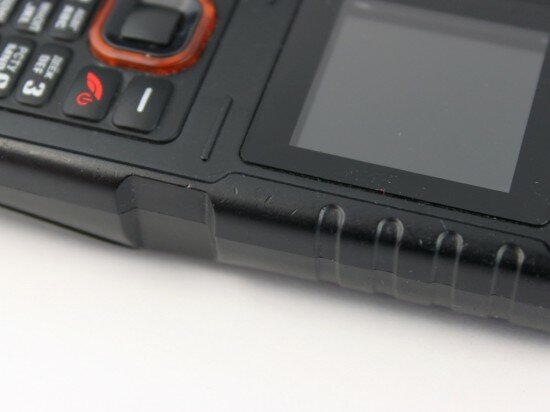
Pic. 17. Small dents after a 5-minute test
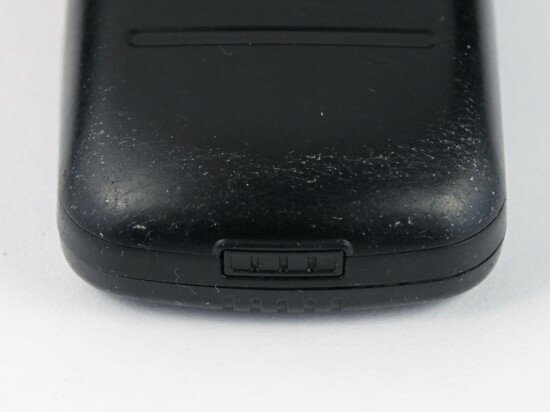
Pic. 18. Here’s how the phone was damaged after the middle part of the test
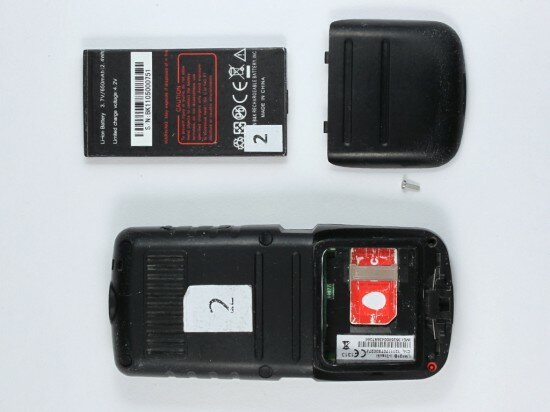
Pic. 19. Here’s how the phone looked like after the whole test
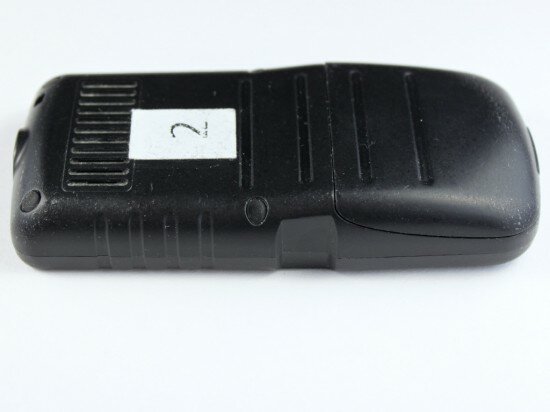
Pic. 20. Here’s how the phone looked like after the whole test (side view)
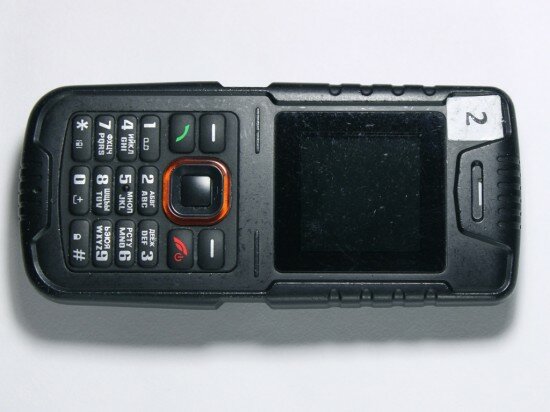
Pic. 21. This is how the screen and the front panel are damaged
Grade (stage 1): 3 (with 3 being the highest possible grade)
Grade (stage 2): 2 (with 3 being the highest possible grade)
Grade (stage 3): 2 (with 3 being the highest possible grade)
11. Scratch resistance of the screen
We decided to check how rigid the screen glass is. We put the handset on a table, laid a plank with a nail in it on the phone and applied 100 g pressure (0.22 lbs) above the plank so that the tip of the nail pressed against the screen (we used a special device for it). Then we moved the phone as if we were going to take it from under the nail. Thus we made the nail run over the screen (video 25).
There was no visible scratch on the screen. We did the same again but applied more pressure – 300 g (0.66 lbs). It was difficult to notice the new scratch in the dark. It was visible only in bright lights. Finally, we applied 600 g (1.3 lbs) to scratch the iTravel LM121B (video 27). This time the damage was visible but the scratch was not very deep (Pic. 22). We are glad to say that this phone has a better screen than many of the other handsets.
Video 27. Scratch test
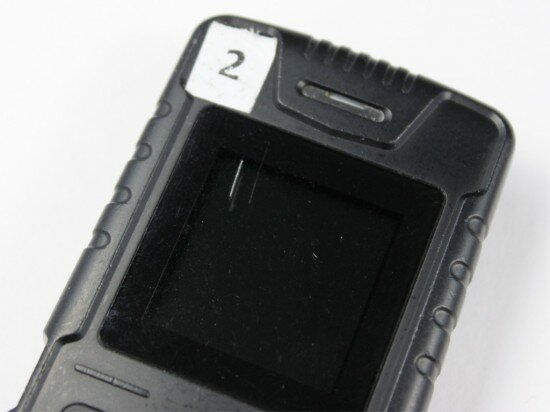
Pic. 22. Scratches on the screen
Grade (stage 1): 3 (with 3 being the highest possible grade)
Grade (stage 2): 3 (with 3 being the highest possible grade)
Grade (stage 3): 2 (with 3 being the highest possible grade)
12. Scratch resistance of the back panel
We scratched the back panel absolutely the same way as the screen and with the same force (video 28). As we said before, the iTravel LM121B is made of a soft, low quality plastic. That’s why all the scratches were visible.
Video 28. Scratching the back panel at the force of 100 g (0.22 lbs)
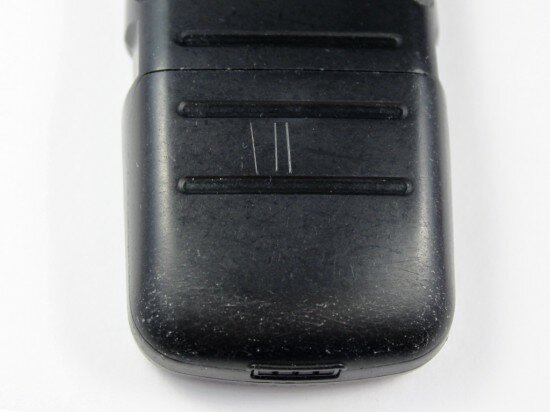
Pic. 23. Scratches on the back panel
Grade (stage 1): 2 (with 3 being the highest possible grade)
Grade (stage 2): 2 (with 3 being the highest possible grade)
Grade (stage 3): 2 (with 3 being the highest possible grade)
13. Breaking the screen glass
We also checked the screen’s rigidity by trying to break it with a steel ball. The diameter of the ball is 22 mm (0.86 inches). We dropped it on the iTravel LM121B’s screen several times from 10 cm (3.9 inches), 15 cm (5.9 inches) and from 25 cm (9.8 inches) (video 29).
The first two strikes didn’t damage the phone. But when the ball hit the screen for the third time we saw a tiny crack. It was visible only in the bright lights. The screen glass was deflected a little bit. However, this damage is unnoticeable if you look straight at the phone.
Video 29. Breaking the screen glass
Grade (stage 1): 3 (with 3 being the highest possible grade)
Grade (stage 2): 3 (with 3 being the highest possible grade)
Grade (stage 3): 3 (with 3 being the highest possible grade)
14. Heat test
Let’s find out how the iTravel LM121B withstands extremely high temperatures. There are few cell phones which can be left in the sun or near an open fire for a long time and stay safe.
We placed the handset and the light bulb (40 Wt) in a small can (video 30 – 32). First, we kept them there for 3 minutes. Then we took out the phone and examined it. After that, we heated the handset for 5 minutes and finally – for 10 minutes.
The phone sustained no damage after 3 minutes of heating. The keypad swelled a little, but became normal soon. Next time the phone showed visible damage. The plastic navigation key melted. The keypad became stiff and uncomfortable to use. After the whole experiment, the navigation key was completely destroyed by the heat and it didn’t function at all.
Video 30. Heating for 3 minutes
Video 31. Heating for 5 minutes
Video 32. Heating for 10 minutes
Grade (stage 1): 3 (with 3 being the highest possible grade)
Grade (stage 2): 2 (with 3 being the highest possible grade)
Grade (stage 3): 1 (with 3 being the highest possible grade)
15. Smashing the phone against a tiled floor
Actually, this is the last stress test in this review. We tried to smash the iTravel LM121B by dropping it on the tile from 150 cm (4.9 ft), 200 cm (6.56 ft) and 240 cm (7.87 ft) (video 33 – 35).
The phone can easily survive drops from 150 cm – official information taken from the website of the manufacturer. Yes, it’s true. However, the handset can’t stand up to drops and bumps from greater heights. When we dropped the iTravel from 200 cm (6.56 ft) its display started to malfunction (check out picture 24). Despite this damage we continued the test. After the last drop (from 240 cm) nothing serious happened with the phone. The plastic caps of the connectors shifted a little. That was all. The result is pretty fine because there was no visible harm.
Video 33. Drops on the tile from 150 cm (4.9 ft)
Video 34. Drops on the tile from 200 cm (6.56 ft)
Video 35. Drops on the tile from 240 cm (7.87 ft)
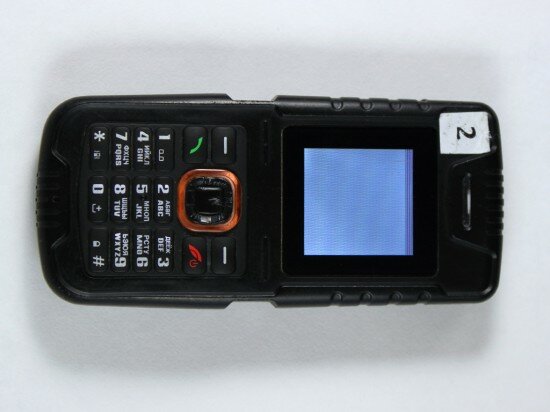
Pic. 24. This is how the display malfunctioned
Grade (stage 1): 3 (with 3 being the highest possible grade)
Grade (stage 2): 3 (with 3 being the highest possible grade)
Grade (stage 3): 3 (with 3 being the highest possible grade)
16. Disassembling. Build quality
After all the stress tests we disassembled this handset (the second iTravel LM121B that we had). The build quality is OK, the same as of the first phone. We can’t answer why the display malfunctioned during the last drop test. May be it is not properly attached to the circuit board. But this is only our speculation. Anyway, we have to lower the grade for the iTravel in this test.
Grade: 2 (with 3 being the highest possible grade)
All in all, the i-Travel LM121B gains 652 points (with 702 being the highest possible grade)
Final words
The i-Travel LM121B made a good impression on us. Even before the tests we were thrilled by its ability to float. It makes this phone unique. Moreover, this is a waterproof handset that can be submerged under water on the depth of 1 m (3.28 ft) and stay functional. Besides, the back cover is easy to remove. Few ruggedized phones have such a feature.
The gadget showed fine results in our stress tests. We immersed it under water not up to 1 but up to 2 m (6.6 ft) for an hour! Nevertheless, the phone stayed functional and the innards were almost dry. It successfully passed the dust test too. There was no dirt inside the casing and we could clean all the dust from the surface of the phone with no problem.
However, the handset has some serious disadvantages. First, the low quality plastic material which easily gets scratches and scuffs and melts in the sun (remember what happened with the navigation key). We also didn’t expect the display malfunction during the last drop test (200 cm on the tile) because the majority of the other phones (not shock proof) passed this experiment with no problem. To compare the i-Travel LM121B and the i-TRAVEL LM801 we should say that the former is more water resistant. At the same time the latter showed better results in the heat and drop tests. By the way, the LM801 has a greater standby time.
Check out video 36 and pictures 25 – 29 to see the state of both i-Travel LM121B handsets after the tests.
Video 36. Here’s how both phones look like after the tests
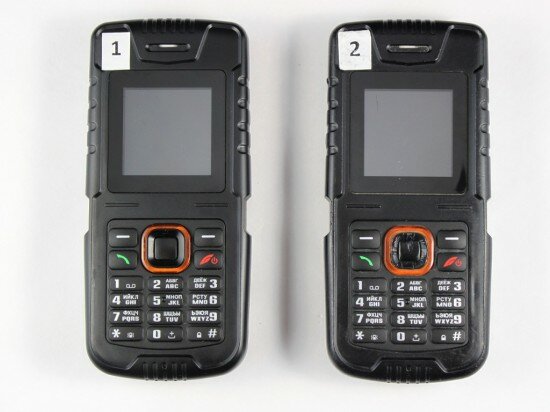
Pic. 25. Here’s how both phones look like after the tests (front view)
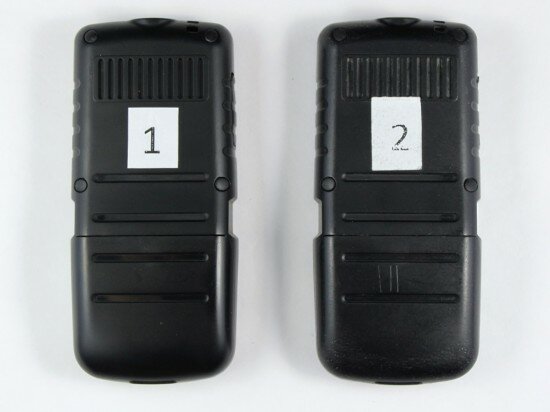
Pic. 26. Here’s how both phones look like after the tests (back view)
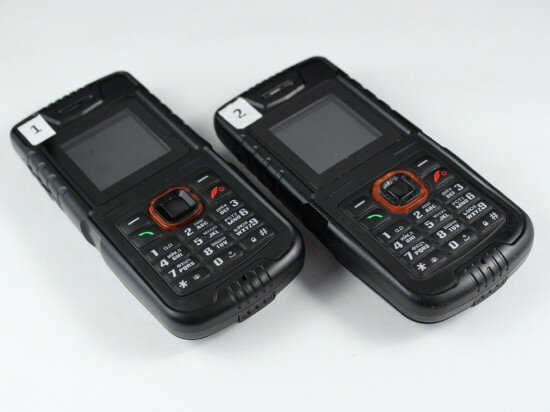
Pic. 27. Here’s how both phones look like after the tests (side view)
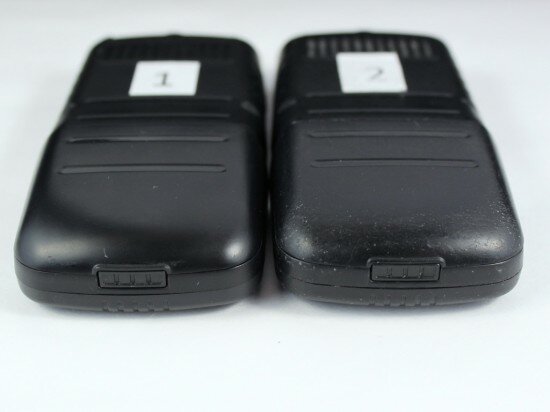
Pic. 28. Here’s how both phones look like after the tests (middle edges)
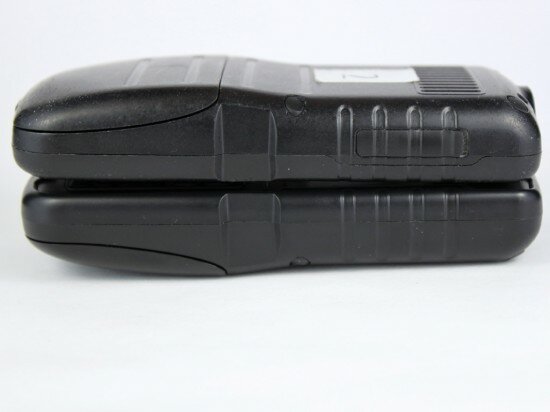
Pic 29. Here’s how both phones look like after the tests (face to face)

 Russian version
Trackback/Pingback (1)
[...] come back to the test of the iTravel LM121b for a moment. This phone has the same of protection and it successfully passed this test. But the [...]